List items
Items from the current list are shown below.
Blog
22 Jul 2012 : The PiBot Raspberry Pi NXT robot #
Inspired by the amazing things the Boreatton Scouts group are doing with their Raspberry Pis, as well as a conversation with David Lamb and Andrew Attwood – two colleagues of mine at LJMU – I thought it was about time I actually tried to use my Pi for something other than recompiling existing software. I'm not a hardware person. Not at all. But I do have a Lego Mindstorms NXT robot which has always had far more potential than I've ever had the energy to extract from it.
But after reading about how it's possible to control the NXT brick with Python using nxt-python, and with David pointing out how manifestly great it would be to get the first year undergraduates learning programming using it, I couldn't resist giving it a go.
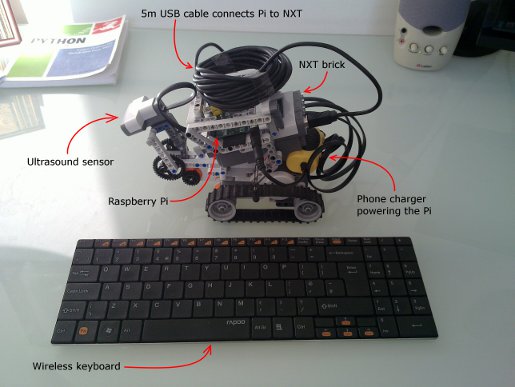
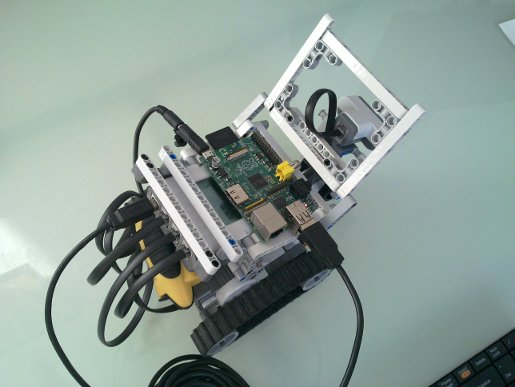
It turned out to be surprisingly easy. The hard parts? First was getting the Pi to discover the NXT brick over USB. The instructions for this aren't too great, but in fact it turned out to be as simple as copying the NXT MAC address into the PyUSB configuration file. Second was getting the Pi, battery pack and 5 metres (yes, you read that right) of USB lead to balance on top of the robot!
 I'm not exactly sure why I bought such a huge lead given I knew it would all end up on top of the robot, but that's planning for you!
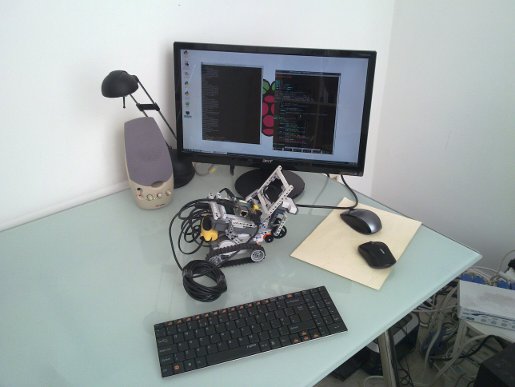
The result really is as crazy and great as I'd hoped. I wrote a 50 line python programme to read key presses and drive the robot appropriately – right, left, forward and back – and nxt-python does all of the hard work. The keyboard is wireless, attached to the Raspberry Pi using a micro dongle. The USB lead connects the Pi with the NXT brick. The Raspberry Pi is powered by a USB phone charger. The monitor lead and ethernet aren't needed when the machine's running, which means the robot/pi combination is entirely self-contained and can be controlled using the wireless keyboard.
It was also possible to read data from the sensors, allowing the robot to drive itself entirely autonomously around the room avoiding objects and generally exploring. The next step is to collect more input about the distance it's travelled so that it can be mapped on to a virtual room on the Raspberry Pi and build a picture of the world.
Here's a video of Joanna controlling the Heath-Robinson contraption as well some photos showing all of the different parts balanced on top of one another.
 The wonderful thing about all of this is that although it requires a huge amount of effort and insight to get each of the individual pieces working, none of the effort was mine. Pulling the pieces together is really straightforward, building on so much clever work by so many people. It's got to the stage where you can grab a phone charger, some Lego, a £35 PC the size of a credit card, a wireless keyboard, an entirely open source software stack, 5m of USB cable and a Sunday afternoon and end up with a complete robot you can programme directly in Python. Brilliant.

 I'm not exactly sure why I bought such a huge lead given I knew it would all end up on top of the robot, but that's planning for you!
The result really is as crazy and great as I'd hoped. I wrote a 50 line python programme to read key presses and drive the robot appropriately – right, left, forward and back – and nxt-python does all of the hard work. The keyboard is wireless, attached to the Raspberry Pi using a micro dongle. The USB lead connects the Pi with the NXT brick. The Raspberry Pi is powered by a USB phone charger. The monitor lead and ethernet aren't needed when the machine's running, which means the robot/pi combination is entirely self-contained and can be controlled using the wireless keyboard.
It was also possible to read data from the sensors, allowing the robot to drive itself entirely autonomously around the room avoiding objects and generally exploring. The next step is to collect more input about the distance it's travelled so that it can be mapped on to a virtual room on the Raspberry Pi and build a picture of the world.
Here's a video of Joanna controlling the Heath-Robinson contraption as well some photos showing all of the different parts balanced on top of one another.
 The wonderful thing about all of this is that although it requires a huge amount of effort and insight to get each of the individual pieces working, none of the effort was mine. Pulling the pieces together is really straightforward, building on so much clever work by so many people. It's got to the stage where you can grab a phone charger, some Lego, a £35 PC the size of a credit card, a wireless keyboard, an entirely open source software stack, 5m of USB cable and a Sunday afternoon and end up with a complete robot you can programme directly in Python. Brilliant.

#!/usr/bin/env python
#

import nxt
import sys
import tty, termios
import nxt.locator
from nxt.sensor import *
from nxt.motor import *

brick = nxt.locator.find_one_brick()
left = nxt.Motor(brick, PORT_B)
right = nxt.Motor(brick, PORT_C)
both = nxt.SynchronizedMotors(left, right, 0)
leftboth = nxt.SynchronizedMotors(left, right, 100)
rightboth = nxt.SynchronizedMotors(right, left, 100)

def getch():
	fd = sys.stdin.fileno()
	old_settings = termios.tcgetattr(fd)
	try:
		tty.setraw(fd)
		ch = sys.stdin.read(1)
	finally:
		termios.tcsetattr(fd, termios.TCSADRAIN, old_settings)
	return ch

ch = ' '
print "Ready"
while ch != 'q':
	ch = getch()

	if ch == 'w':
		print "Forwards"
		both.turn(100, 360, False)
	elif ch == 's':
		print "Backwards"
		both.turn(-100, 360, False)
	elif ch == 'a':
		print "Left"
		leftboth.turn(100, 90, False)
	elif ch == 'd':
		print "Right"
		rightboth.turn(100, 90, False)

print "Finished"
Comments
Uncover Disqus comments